Call-Em-All is an integration available for use within Avionté that allows a user to send mass text messages or calls to employees or contacts. Call-Em-All can be used through Avionté's Advanced Search feature or the Call-Em-All main tree item.
Call-Em-All's automated messaging service enables automatic calling or texting to every phone number on a data list.
Setup at Call-Em-All Site
- Create an account at https://www.call-em-all.com/
- A username and password will be assigned and associated with the entered e-mail address.
- A username and password will be assigned and associated with the entered e-mail address.
- Call-Em-All will assign a unique toll-free number to begin sending out text messages.
- To use an existing toll-free number for use with Call-Em-All texting, contact accountsupport@call-em-all.com
- To use an existing toll-free number for use with Call-Em-All texting, contact accountsupport@call-em-all.com
- A username and password will be assigned and associated to the entered email address.
- Inform Call-Em-All that the application will be integrated with Avionté.
For further details about the Call-Em-All product, visit their knowledge base at http://support.call-em-all.com/
Setup in Avionté
Credentials created on the Call-Em-All site are entered into the Avionté application with Config Options.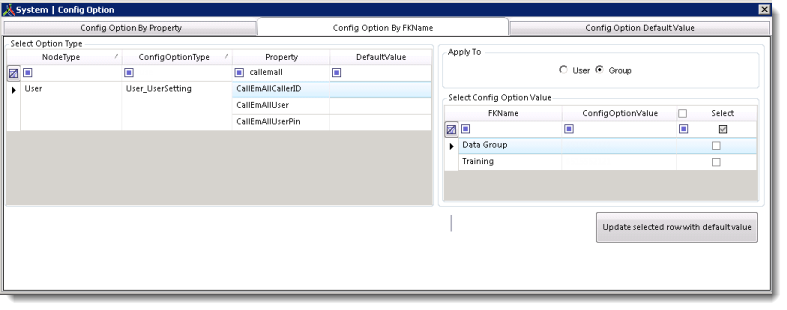
- Navigate to Start Page > Admin Tools > Config Options
- Enter information into the following Call-Em-All related config options for desired users or groups (branch settings are no longer used with the Call-Em-All integration.)
Config Name Description CallEmAllCallerID Enter the phone number that will be displayed to the recipients. CallEmAllUser Enter the username that opens the account at call-em-all.com.
Note: The CallEmAllUser might not be the same as the CallEmAllCallerIDCallEmAllUserPin Enter the PIN (Personal Identification Number.) This is also the password for the Call-Em-All account.
Note: Early users of Call-Em-All used a four-digit PIN. The requirements for new users have changed and passwords added after July 1, 2015 must include:- 8-50 characters
- one letter
- one number
- symbols are allowed, but not required
Four-digit PINs added before July 1, 2015 are still valid.
Make Call-Em-All Visible to Users
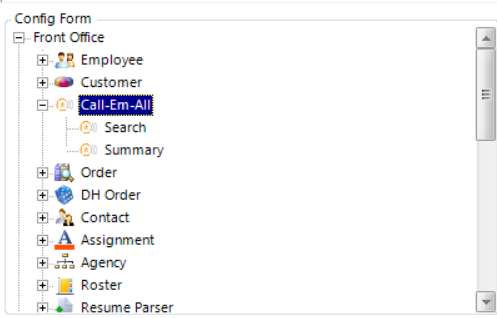
- Navigate to Start Page > Actions > Admin Tools > Form
- Select the Call-Em-All main tree item under Front Office.
- Select User or Group from the Shared By section.
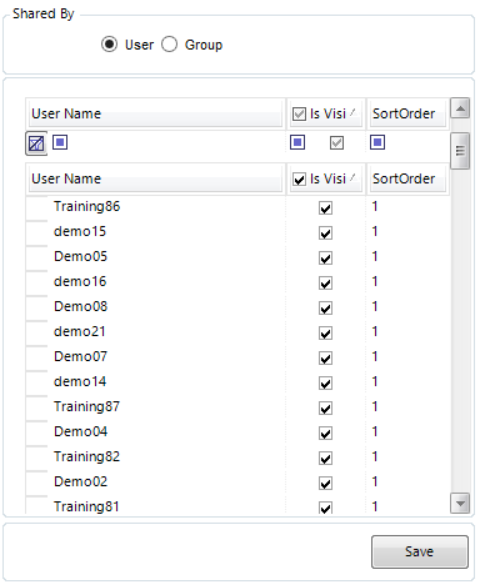
- Click the box in the Is Visible column next to each corresponding user or group that will use Call-Em-All.
- Repeat steps 2, 3, and 4 for the Search and Summary sub-categories.
Configure Employee Contact Methods
- Navigate to Start Page > Admin Tools > Config Choice > Choice Property tab.
- Select EmployeeContactMethod from the Category drop-down menu.
- Select the desired Branch or mark the box Apply changes to all Branches.
- Scroll to the SendTextMessage column.
- Set the SendTextMessage value to "True" for each desired contact method. Tab off the new value to save.
Enter Employee Contact Information
- Navigate to the desired employee's Contact Method section.
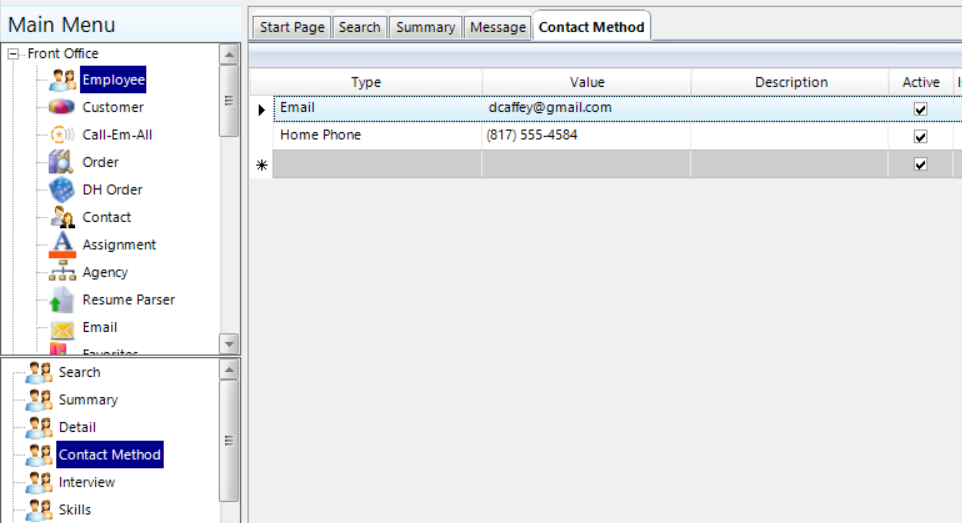
- Ensure all desired contact methods are entered.
- Enter a service provider for the contact method if one is not already present.
Note: A service provider is required for an employee to receive text messages. - Repeat for all desired employees.
Create a new Call-Em-All Message
Create a new Call-Em-All message from the Call-Em-All main tree item or by using the Advanced Search feature within Avionté. The following directions are for initiating a broadcast through the Call-Em-All main tree item.
Navigate to the Call-Em-All main tree item. Select the Call-Em-All button in the top right corner to open the wizard.
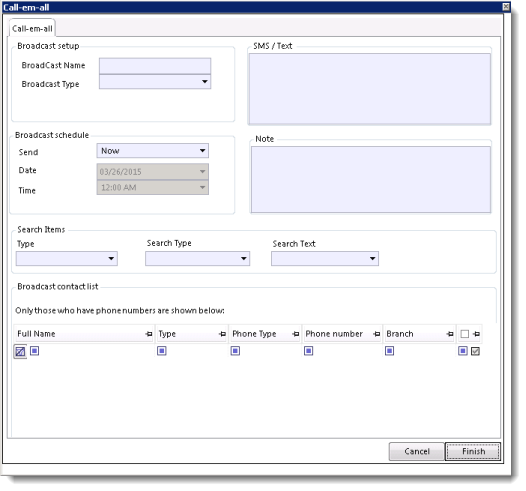
| Field Name | Description | ||||||
| Broadcast Name | Enter a name for the broadcast. | ||||||
| Broadcast Type | Enter a type for the broadcast: Announcement, Survey, SMS/Text, or SMS/Voice | ||||||
| Broadcast Schedule | Select if the broadcast should be sent now or set a specific time and date. Note: The date must be in the future
|
||||||
| SMS/Text | Enter the desired text for the broadcast to be sent. Note: This section will be greyed out on an Announcement or a Survey.
|
||||||
| Note | Enter any desired notes to the broadcast. | ||||||
| Search Items | Search for desired recipients by using the following fields:
|
||||||
| Broadcast Contact List | Desired recipients will populate in the lower grid with the available contact methods. | ||||||
| Finish | Click Finish to send the broadcast. |

To complete the broadcast, call the toll-free number provided on the screen, and enter the appropriate information. For Announcements, Surveys, and SMS/Voice type broadcasts, record the message when prompted.
To track the results of the Call-Em-All broadcast, return to the broadcast's Summary Screen to view all results and information.
Call-Em-All Summary Page
From the Call-Em-All summary page, users may view the broadcast's information and create a new broadcast.
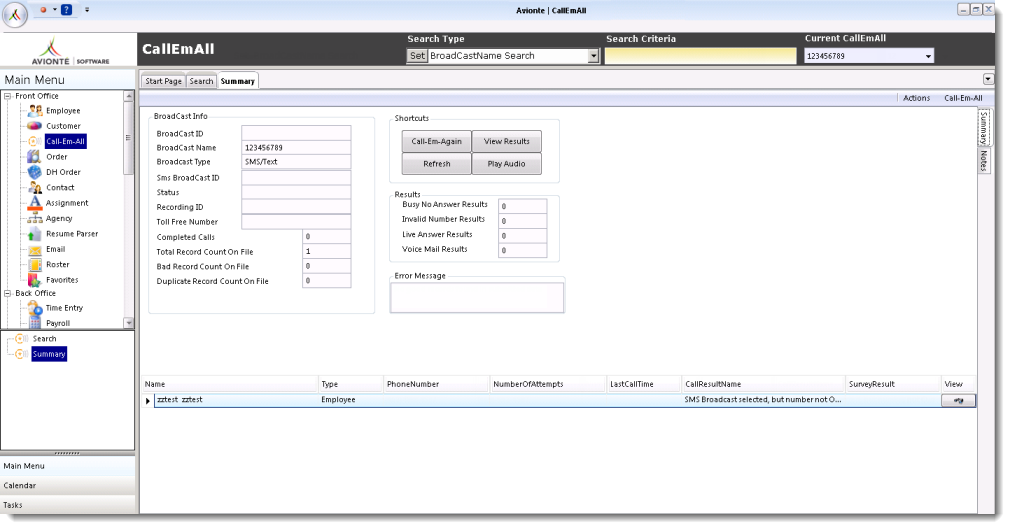
| Field Name | Description | ||||||||||
| Broadcast Info | Displays all of the broadcast's information. | ||||||||||
| Error Message | Displays any errors or if the operation was successful. | ||||||||||
| Results | Displays the results of the broadcast. | ||||||||||
| Actions Menu: |
|
3rd party link Disclaimer: These links are being provided as a convenience and for informational purposes only; they do not constitute an endorsement or an approval by [The author] of any of the products, services or opinions of the corporation or organization or individual. [The author] bears no responsibility for the accuracy, legality or content of the external site or for that of subsequent links. Contact the external site for answers to questions regarding its content.
Comments
0 commentsPlease sign in to leave a comment.