This article provides a description of E-Verify as it is used in the Avionté Suite platform. E-Verify is also available in the Avionté Web-Based Modules. Visit the E-Verify - Web-Based Modules article for more details.
E-Verify is an Employment Eligibility Service managed by the US Government/Homeland Security. When you submit a request for verification multiple facets of an employee record will be examined for validity against the US Government/Homeland Security's records. Due to this, it is possible for a combination of the following steps to be involved in the validation process. This may affect the length of the E-Verify process which may produce instantaneous confirmation or can be delayed for multiple weeks as E-Verify examines their records.
For more information on E-Verify, see the U.S. Citizenship and Immigration Services' myE-Verify website.
All requests begin here. This section displays the employee's I-9 information and allows for the selection of the documents the employee submitted to prove their identity.
- Prerequisites
- Submit Employee Documents
If E-Verify has reason to believe the person submitting these documents is not who they claim they may request visual confirmation that the provided photo matches their records.
You may be required to confirm details for the employee (Name, Date of Birth, State, ...)
DHS/SSA Tentative Nonconfirmation
If the submitted data fails to match their records this screen will appear allowing for the employee to challenge or accept their nonconfirmation.
- Tentative Nonconfirmation Contest
- Tentative Nonconfirmation - No Contest
Request Additional Verification
If the name returned from E-Verify does not match the name on file, a prompt will appear asking for the user to submit for additional verification.
All requests display on this screen. Users will select the employee's current employment status and the reason for this status.
After a case is closed, details on the employee's final status will be displayed here. It is possible to re-start an E-verify case from this screen.
Initiate an E-Verify Request
Prerequisites
- Before using E-Verify, you must be enrolled in the integration. For more information on enrolling with E-Verify, see the E-Verify Enrollment article.
- After enrolling with E-Verify, the integration must be set up to work in Avionté. For more information on setting up an E-Verify account in Avionté, see the E-Verify: Integration Setup article.
- Before initiating the E-Verify request, the employee must have completed their I-9 eDocument in order for their information to populate into the employee information field. For more information on completing an I-9, see the USCIS: I-9 Employment Eligibility Verification website.
Submit Employee Documents
- From the Main Menu, navigate to Front Office > Employee
- Search for an employee to initiate an E-Verify request for using the search fields at the top of the window.
- Once the employee has been located in the search grid, double-click on their name. The Employee Summary page will display.
- Select E-Verify from the Employee sub-menu. The E-Verify screen will display.

- The E-Verify screen is broken up into three sections; an upper grid, a middle group of information and two radio buttons at the bottom.
Section Description Upper Grid Displays previous E-Verify cases that have been submitted for this employee. This section displays the case numbers and the resolution of each case.
Middle Group of Information Contains fields populated from the Employee's Details screen and their I-9 eDocument. Radio Buttons at the Bottom The radio buttons allow for a User to select which category of documents the Employee has submitted for verification. Selecting either List A documents or List B and C documents will display options available for that document list based on citizen type. - Click either the List A or List B and C radio button at the bottom of the screen to designate the category that the employee's document fits into. Depending on their current citizenship status there are restrictions on what documents can be submitted. After a radio button has been selected, additional options will appear that are specific to that document type.
See the list below to determine if a document meets List A, B or C requirements:
Citizenship Status List A Document (Only one needed) List B Document (One from B and C) List C Document (One from B and C) Citizen U.S. Passport or Passport Card List B
Driver's license or ID card issued by a U.S. state or outlying possession
ID card issued by a U.S. federal, state or local government agency
School ID card
Voter registration card
U.S. Military card or draft record
Military dependent’s ID card
U.S. Coast Guard Merchant Mariner Card
Native American tribal document
Driver's license issued by a Canadian government authority
School record or report card (Under 18)
Clinic, doctor or hospital record (under age 18)
Minor Under age 18 without a List B document
Special Placement
List C
Social Security Card
Certification of Birth Abroad (Form FS-545)
Certification of Report of Birth (Form DS-1350)
U.S. birth certificate (original or certified copy)
Native American tribal document
U.S. Citizen ID Card (Form I-197)
ID Card for Use of Resident Citizen in the United States (Form I-179)
Employment authorization document issued by the U.S. DHS
Non-Citizen U.S. Passport or Passport Card Lawful Permanent Resident Arrival/Departure Record (Form I-94) with temporary I-551 stamp or refugee admission stamp (receipt) Permanent Resident Card or Alien Registration Receipt Card (Form I-551)
Foreign passport with temporary I-551 stamp or printed notation on an MRIV
Alien Arrival/Departure Record (Form I-94) with temporary I-551 stamp or refugee admission stamp (receipt) Employment Authorization Document (Form I-766)
Foreign passport with Arrival/Departure Record (Form I-94) - After selecting either the List A or List B and C radio button, click the drop-down menu and select the type of document that the employee has provided. The drop-down menus display specific types of documents depending on the radio button selected.
- If a List A document was submitted, enter the following information in the blank fields:
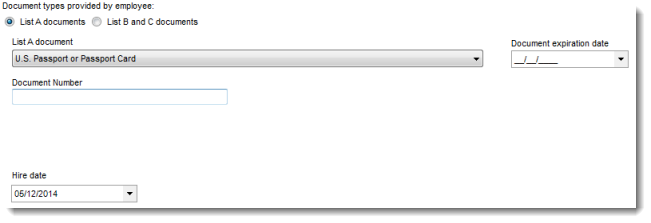
Field Description List A document, List B document or List C document Select the type of document that the employee submitted. Document expiration date Enter the date that the employee's submitted document expires. Document Number The unique number from a submitted document. Hire Date Populated automatically from their I-9, but can be changed manually.
Some documents require different information. See the table below for more information:
Document Information Documentation Expiration Date The date the document will expire and become invalid. Document Number The unique number (Passport Number, I-551 Number) from a submitted document. Alien Number Employee's Alien Number (if applicable). I-94 Number Employee's I-94 Number (if applicable). Hire Date Populated automatically from their work order, but can be added or changed manually. - If a List B or C document was submitted, enter the following information in the blank fields:
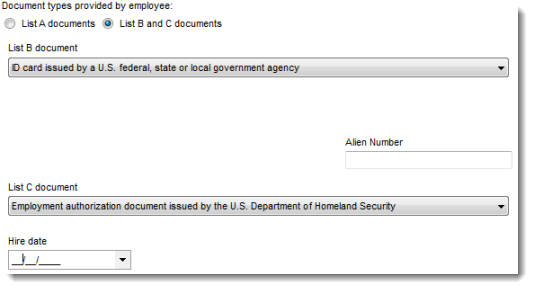
Different documents require different information based on citizenship status such as an Alien number or an I-94 number.
Drivers licenses require additional information:
Information Description Document Name Select Driver's license or ID card. Document State State that issued the document Document Number Required by some states. Document Expiration Enter a date or select no expiration if applicable. Alien Number Employee's Alien Number (If applicable). - Click Process Verification in the upper left corner of the Avionté E-Verify screen.
Photo Compare
In the event that E-Verify requires manual verification of an employee's identity, a screen will display a photo of the employee provided by E-Verify.
- Compare the photo displayed by E-Verify to the photo submitted by the applicant.

- If the applicant matches the provided photo, click the Yes, the employee matches the photo displayed radio button. If the applicant does not match the provided photo, click the No, the employee does not match the photo radio button.
Clicking the Yes or No radio buttons affect the status of the case:
Selection Action Yes Allows a user to close a case. No Triggers a DHS or SSA review.
See below for more information. - When the selection has been made, click Submit photo verification.
Note: No matter what option is selected, this action will be logged in the upper grid.
Confirm Details
Sometimes you may be prompted to confirm information. If you see the screen below, please verify the information.
- Sometimes you may have to update the employee's name (Bob vs. Robert, Jon vs Jonathan, ...) or even if in all caps or lowercase. This is usually due to the employee entering their name but E-verify would want
For the 'State' field, please use ALL CAPS for the abbreviation
DHS/SSA Tentative Nonconfirmation (TNC)
If there was a problem with the submitted information after completing the steps in the Initiate an E-Verify Request and Photo Compare sections of this article, a tentative nonconfirmation is returned.
For more information on Tentative Nonconfirmations, see the U.S. Citizenship and Immigration Services' Tentative Nonconfirmations website. 
- View the tentative nonconfirmation.

- Notify the employee of the DHS Tentative Nonconfirmation (TNC) and follow the instructions under the Notify applicant of DHS Tentative Nonconfirmation (TNC) section of the screen.
- Under the Choose how to proceed with the case section, click one of the radio buttons depending on how the employee wants to proceed:
Radio Button Description Close Case: Employee chooses to not contest the TNC and take no further action. The employee accepts the decision and no further action is needed. Refer case: Employee chooses to contest the TNC The employee has decided to challenge the decision and additional steps are required. See the Tentative Nonconfirmation Contest section below for additional information and steps. - Print the DHS tentative nonconfirmation FAN letter by clicking the Request button and provide the document to the employee.
Tentative Nonconfirmation Contest (TNC)
If the employee chooses to contest the decision, follow the steps in the section below. For more information on following the status of your E-Verify Case, see the U.S. Citizenship and Immigration Services' Case Tracker website.
- Ensure the Refer Case radio button is selected.
Once this radio button is selected, the employee's information will be submitted to either the Department of Homeland Security or the Social Security Administration for manual review and an alert will appear at the top of the window that says "The request is currently under review" and the Referral Date Confirmation (RDC) letter is available in the lower grid. - Depending on the type of nonconfirmation, the employee may have to take additional steps which will be listed in the RDC letter. After the final steps have been taken, a final status will be returned.

Tentative Nonconfirmation (TNC)- No Contest
If the employee chooses to not contest the decision a user should:
- Select the Close Case radio button.
- Select the Initiate Next Step button in the upper left corner of the section. This will take the user to the Close Case screen.
Request Additional Verification
During the final confirmation, if a mismatch was discovered between the name returned by E-Verify and the name on the employee's I-9, a dialog will open prompting the user to request additional verification to resolve the issue.
- Compare the names under E-Verify response and I9 to ensure they match.
- Select either the Submit additional verification or Close current case radio buttons to continue. See the table below for additional details.
Option Description Submit Additional Verification Submits the record to E-Verify in order to resolve the name discrepancy. A comment should be added and will be attached to the request. Close Current Case Should be used to close the case in order to correct a mistake on the I-9 eDocument. - In the text box under Comment, enter any additional comments about this case.
- Click Submit to proceed and close the window.
- The application will either return to a pending status while the additional verification is processed or will proceed to the Close Case screen again.
Note: Referral requires a manual check on E-Verify's end. Please be patient as this process may take some time.
Close Case
If the Tentative Nonconfirmation case was not able to be resolved, follow the steps outlined below to close the case in Avionté. DO NOT close the case on the E-Verify website before closing the case in Avionté. Closing the case on the E-Verify website will prevent any updates from sourcing into Avionté.
If a case was closed on the E-Verify website before it was closed in Avionté, the case will need to be manually closed by Avionté support and result in billable time.
- Click Close Case. A Close Reason window appears.

- In the Close Reason window, answer the Is Employee currently employed by your company? question. If the individual is employed with your company, select the Yes radio button. If the individual is not employed with your company, select the No radio button.
- From the Select the reason to close this case drop-down menu, select the reason for the decision to either employ or dismiss the individual.

- Click Submit to submit the closed case or Cancel to cancel the closure. The Close Reason window closes.
Status Screen

E-Verify Case Number
Once the information has been entered and submitted, E-Verify will compare it against millions of government records. If the information entered matches, E-Verify will return an 'Employment Authorized' result. This confirms that the employee is authorized to work in the United States. After the results have been printed and attached to the employee's Form I-9 (or recording the employee's E-Verify case verification number on the form itself), the employer simply closes the case to complete the E-Verify process.

| Change Log Date | Change Log Description |
| 07/26/2021 | Moved from 'Internal Articles' to 'General Support' section |
| 07/22/2021 | Add section for 'Confirm Details' |
| 07/20/2021 | Updated visibility to Everyone |
| 07/06/2021 | Updated verbiage on TNCs |
| 06/08/2021 | Formatting updates |
| 02/15/2017 | Article created |
Comments
0 commentsPlease sign in to leave a comment.